Recipe: Chili con Queso à la JM

Back in the 1990s, I lived and worked in Boston’s Back Bay area. One of my favorite things to do after work was to stop into Chili’s at Copley Place and get my favorite thing on their menu. It wasn’t their burgers or their margaritas (although I loved both of them). My favorite thing to get was their chips and Chili con Queso. I’ve been known to get a second order of chips and queso because I loved eating it so much.

Chili’s left Copley Place in around 2009, and a few years later, they also closed their location in Harvard Square a couple of years later. Now people in Boston have to go out to the suburbs to get their Chili’s fix.

Looking for a homemade version

Off and on over the years, I’ve looked for a good recipe to make chili con queso at home. I wasn’t able to find one, so I looked for a recipe for queso sauce. All I could find are recipes that use Velveeta. I know some folks love Velveeta, but I disliked the gritty texture I always noticed in dishes that feature the block of pasteurized American cheese product.

What I was able to find was the ubiquitous jars of Tostitos Salsa con Queso. It’s pretty good, but I try not to give money to Frito-Lays’ corporate owner, PespsiCo. PepsiCo has been on my avoid list for several years due to their planet-killing love for palm oil. I’ve tried other brands of store-bought queso sauce, but none of them are as good as Tostitos’.

Having found a queso sauce, I made tacos one night, specifically making enough meat to have some left over. I stirred some taco meat into a bowl of salsa con queso, and I knew I had found the snack I had been trying to duplicate for over a decade.

Before we start, I have to point out something

This recipe makes enough dip for a single serving. You can double it (or more) to feed more than just one person, but you’ll have to increase the heating time. Make sure you heat it at 70% power in the microwave and stir it every 30 seconds.

A good dip needs a good chip

Frito-Lay’s Tostitos brand of tortilla chips is the 600-pound gorilla of the tortilla chip world. I prefer a plain corn tortilla chip like the original toasted corn flavor Doritos introduced to the United States in 1966. Flavored tortilla chips aren’t necessarily bad, and I love the taco-flavored chips Doritos introduced in 1967. But if I’m dipping a tortilla chip into something like salsa or queso, I don’t want a flavored chip to compete with the flavor of what I’m dipping it into.

Santitas, another Frito-Lay brand, became my favorite tortilla chip for dipping with its good corn flavor and easy dipability. I consider it the closest thing to the OG Doritos I loved that you can buy today.

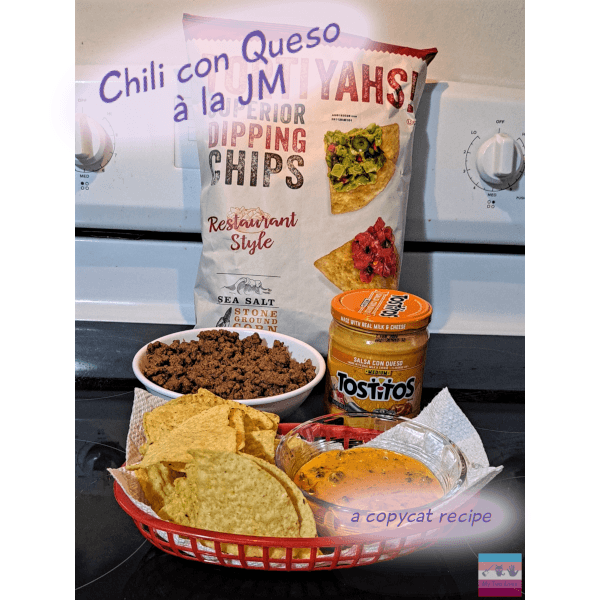
America’s Test Kitchen did a taste test of tortilla chips in 2022, and while they crowned Tostitos their winner, they said Santitas was highly recommended. But they looked at the chips on the market again in February 2025, and the rankings changed a bit. Santitas was now #5, and Tostitos had dropped to #8. I was tempted to try Mission, the chip ranked #1 in the new taste test, and Juantonio’s (#2), but I had tried Over the Border (#3) and thought they were pretty meh. Utz, a regional chip brand from Pennsylvania, came in at #4 with their TORTIYAHS! Restaurant Style Superior Dipping Chips with Sea Salt. I found them at the grocery store and bought a bag to try, and I love them. The Cantina Style is a flavored version that I’m not wild about, but I always have a bag of the restaurant-style chips in my pantry.

Making the dip: First up, Taco Meat

The ingredients needed for the taco meat, clockwise beginning in the upper right corner: A measuring cup with 6 ounces of water, A bottle of Rachel Cooks' Taco Meat Seasoning, a small glass bowl with the amount of taco seasoning needed for the taco meat; A small glass bowl with a tablespoon of water for the slurry for the ground beef; A small bamboo cup with 1/4 teaspoon of baking soda; an unopened box of Arm & Hammer baking soda. In the center of the image is a red plastic bowl with 1 pound of 80% lean ground beef.It’s a pretty simple recipe to make the dip, and the first thing you need is some taco meat. I like to use Rachel Cooks’ version of taco seasoning mix. Not only does it have less salt and none of the preservatives of the supermarket pouches, but you can tweak the recipe to make it your own.

I know most folks know how to make taco meat, but I do something different with mine. Several years ago, I saw a great tip from America’s Test Kitchen to make a slurry before browning the meat. Before you brown the ground beef, toss it in a slurry of water and baking soda to help the meat retains some of its moisture, (I don’t recall where I first saw the tip, but it’s on a sticky note in a kitchen cabinet so I can use it whenever I make something with beef that I dont want drying out.)

After browning the ground beef, drain the grease and sprinkle your taco seasoning mix over the beef, then add some water to make a sauce that will help flavor the meat.

Now to add the meat to the queso

Ingredients for the Chili con Queso dip, along with the chips that will be eaten with the queso. Going clockwise from the top of the image, a bag of TORTIYAHS! Superior Dipping Chips Restaurant Style with Sea Salt; an jar of Tostitos' Salsa con Queso with medium spiciness; A medium glass bowl with 1/3 ounces of cooked taco meat; A white salad bowl filled with prepared taco meat. In the center of the image is a white salad bowl with 2 ounces (56 grams) of tortilla chpsThis was the hardest part. How much queso should I start with, and how much taco meat do I add to it? It was hard to find that Goldilocks point, and I always forgot to make a note of my proportions. Once I decided to develop the recipe for sharing, it took me several iterations to nail down the ingredient list.

I like to serve it in a paper-towel-lined plastic restaurant-style plastic basket that I got from Dollar Tree, but they’ve been discontinued. The basket gives me enough room to put the bowl of dip into the basket along with the chips.

Nutrituion

If you’re hoping to see nutrition information for this recipe, I don’t have it. I won’t call taco meat, store-bought queso sauce, and tortilla chips a healthy snack, but I don’t have the resources to get nutrition information for my recipes.

The Recipe
A bag of TORTIYAHS! Superior Dipping Chips Restaurant Style with Sea Salt, a bowl of prepared taco meat, a jar of Tostitos' Salsa con Queso, and a red plastic restaurant-style basket, lined with a paper towel, and filled with tortilla chips and a bowl of Chili con Queso à la JM.
Chili con Queso à la JM

Serves: 1

Ingredients

Taco Meat

  • 1 lb 80% lean ground beef
  • 3 tablespoons water, separated
  • 1/4 teaspoon baking soda
  • 2 tablespoons taco seasoning (I use the recipe from Renee Cooks)

Queso Dip

Instructions

  • If you’re making taco meat for this, put the ground beef into a medium mixing bowl.
  • Make a slurry by putting 1 tablespoon of water into a small bowl and adding the baking soda to the water. Stir the baking soda into the water, making sure it’s well mixed and you don’t have any baking soda at the bottom of the bowl. (Doing it in this order makes it easier to mix it together. If you add the water to the baking soda, it’s really hard to get rid of the bubbles of dry baking soda.)
  • Pour the slurry over the ground beef, and toss the beef to make sure it’s all coated with the slurry.
  • Brown the ground beef over medium heat in a nonstick skillet, using a wooden spoon to break up the ground beef into small pieces. Continue cooking until the ground beef is no longer pink. Drain the grease and return the skillet to the heat.
  • Sprinkle the taco seasoning over the ground beef and pour 2 tablespoons of water over it. Stir it all together and simmer, stirring occasionally, until the sauce reduces and is almost completely absorbed by the ground beef, approximately 6 minutes. Remove the ground beef from the heat and allow it to cool for 15-20 minutes.
  • Once the meat has cooled, put 1/2 cup of queso into a medium bowl. (I use a 10-ounce glass custard cup.) Stir in 1/3 cup of the taco meat. (Serve the rest of the meat in tacos or store it in a covered container in the refrigerator for another use.) Stir until well mixed and put in the microwave oven, covering the bowl with a small plate to prevent splatters.
  • Heat the dip for 2 to 2-1/2 minutes at 70% power, stirring every 30 seconds. If you’re using queso and taco meat from your refrigerator, you’ll definitely want to go the full 2-1/2 minutes. Be careful, the bowl will become quite hot. You may want to serve the dip before the 2 minutes are up, but going the full time will heat it enough to keep from losing too much heat as you enjoy it.
  • Serve with tortilla chips.

If you make this, leave a comment letting me know how it comes out. If you know of a good recipe for a queso sauce that doesn’t use Velveeta, I’d love to know about it.

Recipe: Salad Russe à la J.M.

Growing up in New Orleans, my mother and grandmother weren’t typical American meat-and-potato cooks. They were more Creole cooks, making great use of the flavors and ingredients that were plentiful in South Louisiana. One of my favorite things my mom made was a salad called Salad Russe. It’s a great make-ahead salad for hot and humid New Orleans summer evenings.

I never got her recipe, but I managed to recreate it and put my own twist on it. It’s super simple, and you may have all the ingredients already. I use two ingredients from New Orleans that can be found online. If you can’t find the specific ingredients I use, you can get substitutes at your local grocery store.

Cool your veggies before adding the other ingredients

After cooking the vegetables, allow the veggies to cool on a rimmed sheet pan before adding the other ingredients. This is a tip I got in a recipe for a rice dish from America’s Test Kitchen, but I don’t remember which recipe it was. I love how it lets me get back to making the salad more quickly.

I know cooling the veggies on a rimmed sheet pan is an extra thing to wash. I’ve found that adding the mayo to hot veggies changes the texture of the mayo in a way that doesn’t benefit the salad. You can add the salt and pepper while the veggies are still hot, but I find I can mix it in better once it’s in the mixing bowl.

Notes about my ingredients

The ingredients for Salad Russe a la JM: Blue Plate Light Mayonnaise with Olive Oil, a bag of Steam Ready Mixed Vegetables, and a bottle of Zatarain's Creole MustardThe links below go to the manufacturer’s pages for the products. You can order directly from these links, and you can also buy them from Amazon. I’m providing alternate links for those who would prefer not to shop with Amazon.

The mayo and mustard I use are products that I grew up eating in New Orleans. I grew up eating Blue Plate Mayonnaise, and I often drove past their factory when I would drive to work downtown.

You may wonder why I use an olive oil mayonnaise rather than regular mayo. One of my doctors put me on the Mediterranean Diet a few years ago. I got a jar of Blue Plate Light Mayo with Olive Oil to see how it was. It turns out I couldn’t tell the difference between the two mayos, so I’ve switched to buying the olive oil variant. If you prefer a different brand, you can use it, but Blue Plate has a flavor profile that no other mayo has.

I always put Zatarain’s Creole Mustard on my sandwiches growing up, and it’s been a standard condiment in the house since I learned I could buy it online. My mom’s Salad Russe didn’t include mustard, but I added it to this salad to give it a little extra zing. People who have tried my Salad Russe say it makes my already great salad even better. You can substitute Dijon or spicy brown mustard if that’s what you prefer, but it won’t taste the same.

Salad Russe à la J.M.

Ingredients

  • 1 12-ounce bag of frozen steam-in-the-bag mixed vegetables
  • Salt and pepper to taste
  • 3 tablespoons Blue Plate Light Mayonnaise with Olive Oil
  • 2 teaspoons Zatarain’s Creole Mustard

Preparation

  • Cook the bag of mixed vegetables according to the package directions. If you prefer to cook them on the stovetop instead of in the microwave, that’s fine. I nuke them because it’s quicker and easier to do.
  • Optional, but recommended: Spread the cooked vegetables out on a rimmed baking sheet and allow them to cool, approximately 5-10 minutes. If you don’t do this, let the vegetables cool completely before the next step.
  • Move the cooled mixed vegetables to a medium mixing bowl and add salt and pepper to taste. I don’t have measurements for the salt and pepper because I’ve never found a set amount of salt and pepper that I use.
  • Stir in the mayonnaise, making sure to coat all of the vegetables. If you want a creamier salad, you can add a little more mayonnaise. Just make sure you don’t end up making the salad scream MAYO at you when you taste it. I did that once, and it wasn’t pretty.
  • Stir in the mustard, making sure it’s well distributed across the salad.

You can serve it immediately, but it’s even better if you put it in the refrigerator for an hour or so to let the flavors meld before serving.

If you make it, let me know what you think of it. I think you’ll find it’s a perfect vegetable side all year round, especially when it’s hot and you don’t want to cook.

Happy Lundi Gras, y’all!!

(This article contains affiliate links. If you buy something from the links I may receive a small commission for your purchase.)

Tomorrow is Mardi Gras Day in my hometown, New Orleans, which makes today Lundi Gras. The Monday (Lundi en Français) before Mardi Gras used to be a day to rest and recover from the massive parades over the previous weekend. It became its own day of celebration in 1987, and NewOrleans.com has the details on the newer Lundi Gras celebrations.

Tonight’s Parades

Google Maps showing the NOLAcom building about a block and a half down St. Charles St. towards Julia Street from Harmony CircleTonight we have the parades for the Krewe of Proteus and the Krewe of Orpheus. You can watch the parades on NOLA.com | The Times-Picayune Parade Cam. They’ll be streaming from The Times-Picayune building just east of Harmony Circle (formerly named for a losing Confederate general) beginning at 5:15 pm Central Time, just keep in mind that it will take some time for the parades to get to Harmony Circle.

Orpheus will have the terrific twosome of Neil Patrick Harris and David Burtka as their celebrity monarchs, and I’m going to try to get the stream hosts to shout “Spice up your life!” at Neil. Why, you ask? Because he danced to that song from the Spice Girls in the third 60th anniversary Doctor Whoo special, The Giggle.

Mardi Gras Day

You can stream the Mardi Gras Day festivities from several sources in La Nouvelle Orléans. In addition to several marching groups, there are parades in New Orleans for the Krewes of Zulu and Rex (the King of Carnival) as well as truck parades for the Krewes of Elks Orleanians and Crescent City.

NOLA.com’s Parade Cam will stream Zulu and Rex, and it will be a nice way to watch the major New Orleans parades on Fat Tuesday. Local NBC affiliate WDSU (a sister station to ABC affiliate WCVB, the station I watch for local news in Boston) will add coverage for some of the marching clubs, black masking indians, and truck parades. WDSU will also cover the parades in the surrounding area for a more inclusive day of coverage. NOLA.com’s stream will start at 8 am Central Time and WDSU will start streaming both on their website and the Very Local app beginning at 6:00 am Central Time. (WDSU is a sister station to WCVB, the station I watch for local news in Boston.)

Do you want some New Orleans-esque food for Mardi Gras?

Mardi Gras donuts from Mardi Gras Day 2023My family has two food traditions for Mardi Gras Day. We start with Mardi Gras donuts, which are similar to beignets but without the yeast. The recipe is super simple with just three ingredients. The picture is the donuts I made for last year’s Mardi Gras Day.

Important note: Once again, I forgot that the recipe I got from my aunt doesn’t include any liquid. I’ll have to correct the recipe in the coming months, and when I do I’ll post the update here. I’ll also write a stand-alone article with the corrected recipe for Mardi Gras 2025, which will be on 4 March 2025.

  • 1 cup all-purpose flour
  • 1 egg
  • 1 teaspoon granulated sugar
  1. Mix the ingredients.
  2. Roll thin and cut into triangles or diamond shapes. Cut a vent slit or two, depending on the size of the triangle.
  3. Fry till crispy in vegetable oil heated to 3500℉.
  4. Dust with powdered (confectioner’s) sugar.
  5. Bon appetite.

They go great with a nice cup of Community New Orleans Blend if you’re able to get it. I buy it from Amazon and it’s the coffee I brew every day. It doesn’t contain chicory, but it’s the coffee my family made when I was younger. You can add plain chicory to get coffee and chicory, but the brand of chicory I used was discontinued, and I haven’t found a new brand I love yet. If you like cold brewed coffee, I can promise you that New Orleans Blend is delicious brewed cold.

Our other Mardi Gras Day food tradition is a simple lunch to take to the parades: fried chicken. Not only is it a great thing to eat between parades out on the route, but you can also have it for dinner if you have any left. Just serve it with a simple salad, and it’s a (fairly) nutritious meal on a very full day.

I could fry up a batch of air fryer wing dings (I need to post that recipe soon), but I bought a tray of fried chicken while I was making a few groceries.

Have a great Mardi Gras and laissez les bons temps rouler, y’all!

One more quick note

Thanks to a nice long bit of jury duty, I’m finally getting some gear for recording demos of some of my songs. I’ll be posting a teaser clip for Somewhere Someone Cares in the coming days to YouTube so you may want to subscribe to my channel at @JMHardin and click the bell so you get notified when it drops. I also post cute videos of Babe, my upstairs neighbor’s cat, so if you like cat videos you may have another reason to follow my channel there.

Coffee and Chicory, Hardin Style

Growing up in New Orleans, I always drank coffee and chicory. Many people think chicory makes coffee stronger, but it really adds complexity to coffee.

After moving to Boston in 1989, I couldn’t get my chicory coffee because Boston stores don’t carry it. Now and then, I could find a can of Luzianne or French Market coffee at the grocery store, but it wasn’t available in the stores where I usually shopped.

Last year, I discovered that I could find coffee and chicory on Amazon. I found not only the Luzianne Coffee my mom made when I was a child, but they also had the Community coffee we came to prefer.

I immediately stopped buying the coffee I had been drinking and switched to only buying my Community Coffee New Orleans Blend. It was great to be drinking the coffee I drank back home, even though it wasn’t quite the coffee mom used to make.

I’ve long had mild tinnitus, but after getting my 2nd COVID jab, the ringing went from occasional to persistent, and I got hit with pain along with the ringing. When I saw my ENT doctor, she said that caffeine is a big trigger for tinnitus, so I tried making a half-caff blend for my coffee.

Community’s New Orleans Blend coffee doesn’t have a decaf version, so I bought a bag of decaf coffee and chicory. I found the blend a little too bitter for my taste, so I went back to just getting the New Orleans Blend coffee. I said it wasn’t quite what my mom made because she added a chicory product called Coffee Partner to each bag of coffee, but it wasn’t easy to find. Eventually, I found it on Amazon and got a box, and I remembered why my mom made coffee this way. It made delicious, rich cups of coffee with that extra kick that New Orleans insist on getting from their coffee.

It’s a pretty straightforward recipe, but I wanted to pass along the recipe I came up with so you can try it at home. You’ll need a large bowl, a digital scale, and a whisk. You do have a digital scale in your kitchen, right? A lot of people can measure by sight, but my eyes aren’t calibrated nearly well enough. If you do any baking from scratch, your digital scale is required to get the proportions right for the chemistry that is baking.

The necessary ingredients. A box of Coffee Partner Chicory, a bag of Community Coffee New Orleans Blend, and a canister to hold the combined grounds.

Recipe: Coffee and Chicory, Hardin Style

Ingredients

  • 1 12 oz bag of Community Coffee New Orleans Blend
  • 3.25 of Coffee Partner (92g)

Add the coffee and chicory into a large bowl and whisk until well combined. Store in an airtight container away, preferably a vented container that will allow CO2 to escape but not allow air to come in.

Like I said, it’s pretty straightforward. I love my 22 oz stainless steel canister from Veken for storing my coffee. It seals with a simple latch, a measuring scoop with a hook for storing it, and it even has a date tracker to let you remember when you last filled it.

Products mentioned

This article contains affiliate links. I may earn a commission should you make a purchase using my links.

Have you tried my mom’s way of making chicory coffee? I’d love to hear what you think of it.

Do you love salad dressings?

Growing up, my mom and grandmother gave me a love of eating good salads, and in the last few years I’ve started changing from buying salad dressings to making my own. Not only do they not have all the preservatives the stuff on the grocers’ shelves have, they’re also pretty easy to make. I cook for just one, li’l old me, so I’m not going to go through huge productions just to have homemade salad dressing.

Some time back I discovered Rachel Cooks when I was looking for a homemade taco seasoning recipe (there’s also a large batch recipe if you find you want to make it less often but enjoy it regularly). Then I discovered her honey mustard vinaigrette dressing and I became hooked on her recipes.

I’ve since subscribed to her email newsletter, and today’s edition was all about her yummy salad dressings. After tweeting a link I decided to share all of the salad dressing recipes I use. They’re not all from Rachel (sorry!), but they’re so good that I bookmarked them so I could find them easily. I put vinaigrettes into Good Season cruets, and right now I have a bottle of their Italian dressing just to use up one of the packets I got when I decided I wanted a second cruet for salad dressings. My creamy dressings are in repurposed salsa jars, which makes me glad I save my old jars after I empty them. (My taco seasoning is in a reused spice bottle that lives next to my nukeomatic.)

My gateway to homemade dressings was the vinaigrette from The Kitchn’s Classic Salad Niçoise. I don’t remember where I saw the recipe, but I quickly bookmarked it as something to try. I’ve since made it for other salads, and if I didn’t have a bottle of Italian dressing in my fridge the bottle would have balsamic vinaigrette from a stand-alone recipe.

I think I found Rachel’s honey mustard vinaigrette recipe while looking for balsamic vinaigrette recipes, and it quickly became my favorite dressing. I use Grey Poupon’s Harvest Coarse Ground Dijon Mustard in it, and I’m thinking of trying it with Zatarain’s Creole Mustard something that I grew up eating on sandwiches. I could easily use just this dressing on all my salads if I didn’t want to make sure I didn’t get sick of eating it all the time.

Every now and then I want some thousand island dressing and wanted to find recipe, but every recipe I found used a hard boiled egg. Adding the egg sharply reduces how long it will last in your fridge, and when I was ready to make it I wanted something that needed less prep work than Rachel’s recipe called for. I ended up going with a recipe from Simply Whisked, but I’ll give Rachel’s recipe a try for the next batch, but my days of buying bottles of thousand island are over.

When I was in high school, Kraft’s Catalina dressing was my go-to dressing. Since I got older I didn’t like how sweet it was, but every now and then I still want some on my salad. Rachel has a recipe for that, and it’s just what the doctor ordered. I mixed it up in a salsa jar to save a dirty bowl, but my immersion blender clearly wanted more room to work so next time I’ll dirty a bowl to make it. And I know I’ll make it again. The recipe says to run it through the blender, but I really hate having to clean my blender for such a small amount of dressing.

I’m not a big ranch dressing eater, and I rarely buy buttermilk unless I’m whipping up a batch of buttermilk drop donuts so I may buy a bottle of ranch dressing from time to time. There is one other kind of bottled dressing that I used to buy and I had a hard time finding a replacement. I love dipping my homemade chicken tenders in honey mustard dressing, but Rachel’s recipe isn’t what I want to dip my tenders in. In fact, most of the recipes I found weren’t the nice, creamy dressing I was looking for. I ended up trying the dip recipe for The Kitchn’s Turkey Wraps with Honey Mustard Dip and it’s pretty good.

Rachel’s list of salad dressings & toppings includes two recipes I definitely want to try. One is for homemade croutons, and the other is for Caesar Croutons. I really like croutons, and I used to be able to eat them right out of the box, but lately it seems the croutons I buy are bigger than the ones I got in my 20’s. Rachel’s recipes use sliced bread, which will make for the size of croutons I’m wanting. Then the only salad topping I’ll need to make myself is bacon bits, and I need to work on my chopping skills to get good bacon bits. And, of course, I need to not eat the bacon before I have a chance to turn them into bacon bits, but I know I’m not the only one who thinks there’s no such thing as too much bacon.

I’m thankful that I got my mom’s love of cooking, and her desire to do more than your basic American meat-and-potatoes cooking. Maybe it came from living in New Orleans, where your basic meat-and-potatoes meal can be as out of place as a harpsichord at a guitar shred fest. Wherever it came from, I love to cook and the only reason I don’t try more recipes is because it’s rare to find recipes that will only feed one person. That and the fact that so many recipes I’d want to try use ingredients I don’t usually buy, and I’m concerned about being able to use up what doesn’t go into the dish.

Comfort food from my days at summer camp

Camp Windywood at the Fontainebleau State Park in Mandeville, LA.

Updated 22 April to finally add a picture of the egg placed into your ring of bread. I’m sorry it took so long to get added.

When I was a kid my mom was a single mother, and my brother sister and I lived with our grandparents. Since my grandmother was a Girl Scout leader known as Cappy that meant every summer until I was old enough to be left behind I got packed off to Camp Windywood. Being a tween-aged boy I wasn’t thrilled with having to go to Girl Scout camp every summer, although now I wish I had been able to enjoy more of it. Back then I was a city kid who hadn’t fallen in love with being able to get out in the woods from time to time like I do now.

One thing I always enjoyed about going to camp was cooking on buddy burners, and the way we cooked fried eggs was so tasty that I still cook eggs that way 40 years later and refer to them as camp-style eggs.

more “Comfort food from my days at summer camp”

Trail Mix, Peng Style

I love to eat, but what I may love more is to cook. Some of the things I cook often are Red Beans & Rice (I am from New Orleans after all, where red beans & rice is a Monday dinner tradition)  and Chicken Piccata, but I have a bookmark folder full of things to make and things to try,

When I was a teenager my grandmother used to tease me saying I didn’t eat three meals a day, I ate one. It started when I got up and it ended when I went to bed at night. I still love grazing but with me being in my 50’s I try to eat better, even when I graze. One of the things I love to nosh on is trail mix, but not just any trail mix. I have my own trail mix that I like to make. more “Trail Mix, Peng Style”