Politics in the United States has become a real mess. Those in power take advantage of the chance to be full-on fascists. Congresspeople of their party aren’t willing to stand up to them. And most of those in the other party do little except write strongly-worded statements about it. It feels like the voters are truly getting the proverbial fuzzy end of the lollipop.
Elections aren’t doing jack squat for folks in the country. So many of the members of the Democratic Party showing that they’re Republican Lite just makes it worse. It’s no wonder that there’s a movement afoot to ignore political parties and vote for candidates that show that they’re willing to work for We The People, not the big money campaign donors, and definitely not the oligarchs.
That movement, and comments from Early American historian Joanne B. Freeman, have inspired me to create a new design. It’s a great way to show that you will vote for We The People, not people in a particular political party, and I created versions that will work on light or dark backgrounds.
And if you have a car or truck with a bumper, have we got a sticker for you.
It’s not just about being Progressive
I know that there are some great progressives in Congress, but let’s not make being progressive the litmus test for who we vote for. Instead, let’s look at where their money is coming from. If you support the civilians in Palestine, you can use TrackAIPAC.com to see if a candidate is taking money from people who don’t recognize the right of Palestinian civilians to exist.
Also, look at how long someone has been in Congress. If they’ve been in Congress since before the aircraft flew into the World Trade Center, it may be time to let them go write their books and play with their grandkids. Thank them for their service, but let some younger folks with fresh perspectives represent you.
Whose country? Our country.
Our elections have been rigged, and they have been rigged for decades. So let’s get together and vote for folks that won’t take donations from any big money PACs or donors. Let’s tell the pols it’s time to represent the folks who are just trying to make a better life for their families than they had.
It’s been a while since I wrote. I wish I could say that life has been extra busy, but that’s not even the half of it. (I started writing this in early September, added a little more in November, but am just now getting it publish-ready. Sorry!)
Content Warning: This article discusses major surgery and bodily functions. It may not be appropriate for people with sensitive stomachs.
The month of September started with me going into the emergency room with bladder issues. I ended up being catheterized, and I learned that I had stage 2 bladder cancer. Surgery would remove a squamous cell cancerous growth in my bladder. While the surgeon got all of the cancer, the cancer was a very aggressive cancer. An even more aggressive surgery was on the horizon to try to make certain it was completely removed.
Major surgery
The surgery was on the day that the LA Dodgers and the Toronto Blue Jays played game 1 of the 2025 World Series. My cancer surgeon removed my bladder, along with my prostate and some of my lymph nodes. The procedure, called a urinary diversion, lasted over four hours. I had three options for my surgery: an ileal conduit, a neobladder, and a catheterizable pouch. The pouch wasn’t a good option for me, so that left two options for me.
My surgeon didn’t have a preference between the remaining options, but the neobladder would have required frequent catheterization. I didn’t mind having a catheter in my bladder between my 1 September ER visit and my first surgery. A neobladder would have meant a fresh catheterization several times a day. Thank you, no.
The ileal conduit uses a section of bowel to create a tube from the kidneys to a port on the belly called a stoma and into a wearable pouch called an ostomy bag. The bag has to be emptied several times a day, but I got used to emptying a leg bag when I was catheterized. That meant emptying my ostomy bag is no big deal. When I go to bed, I connect a bed bag as I did with the catheter. In the morning, I empty it and rinse the bag with a vinegar-water solution.
The joys of the ostomy bag
The biggest hassle is changing the ostomy bag twice a week, which is glued directly to my stomach around the stoma. Before I can apply the new bag, I have to clean the stoma. There are multiple steps to changing the bag, but the longer I do it, the easier it will become. My visiting nurse says I’ll be able to do it with my eyes closed. Unfortunately, I’ll have to check to see if the size of the stoma has changed. It changes as my body changes, so I may need to trim the opening of the ostomy bag to fit the stoma.
Several parts need to be collected, trimmed, and connected as I change the ostomy bag. Since nobody’s body is the same, there’sno way to combine everything into a single unit. There is a company that combines three of the four parts, but so far, I prefer assembling the parts myself. I tried the combined parts, but I had too many problems with leakage.
That’s not the biggest problem
My doctor wouldn’t let me go home until I could move my bowels. I got so much gas that I screamed into a pillow or a towel because it can hurt so much. To add insult to injury, my bowels didn’t move like they used to. My bowels could go from not doing anything to expelling juicy waste in unending dribs and drabs. I have to spend a good bit of time cleaning up, and the fluid that came out was very acidic and irritated my bum pretty badly. Thank the Goddess for Depends because I would have had to throw away multiple pairs of underwear every week.
Food, glorious food
My doctor had told me to think of eating 5 or 6 smaller meals rather than 3 regular meals, and I tried to do that for a while. I’m more of a grazer than a 3-meals-a-day girl, so it’s easier to make the change. I’m also trying to get my big meal closer to lunch time to make it easier to empty my bowels earlier in the day, but that’s still a work in progress. With the calendar reading December, I’m pretty much back to eating what passes for normality for me. It’s good to be eating normal food again, but I still have to do some tweaking to my eating habits.
I found a great cookbook to help me make better food and try to get back on the Mediterranean Diet. I had been using Emily Cooper’s Mediterranean Diet on a Budget, but between the expense of the ingredients and the amount of food the recipes made, I took myself off the diet last year.
I’ve long been a fan of Kelly Jagger’s Cooking For One cookbook series, and she has added The Ultimate Mediterranean Diet Cooking For One Cookbook to the series. It has recipes that will feed one person rather than a small army like Cooper’s recipes do. The only thing I have to do is to get some smaller cooking and baking pieces. Now all I need to do is go through the cookbook some more and choose what recipes I want to try. Then I’ll have to get the ingredients so I can start making them.
Momma kept needing a nap
Once I got home from the hospital, I was getting naps in during either the afternoon or evening, if not both. I’ve always been a “Once I’m up, I’m up,” kind of person, but I’m learning to embrace the nap. It helps that when I lie down for a nap, my furry son Chuck comes and lies down with me. He’s been a wonderful furry nurse since I came home from the hospital. He even learned that it’s not good to get on mum’s belly because it hurts her so much.
I don’t nap as often as I did after the surgery, but there are still evenings when I move to the bedroom. I may not nap, but I’ll chill for a few hours. There’s just one problem: Things don’t get done when I move to the bedroom, like finally getting this article written or working on my music.
How’s the music going?
I wish I could say I’ve been working on it, but I haven’t picked up my guitar once since the surgery. My DAW software hasn’t been opened in a while, because my attention span doesn’t last quite enough to work on my song. I hate that, but with luck, things will change as I recover more from the surgery.
I still have a lot of work to do on my song, plus I have other music in my head as always.Once I’m able to get back to an abbi normal schedule, making music will go back on the daily gotta-do list.
The dreaded premature computer OS upgrade
I’d been waiting to upgrade the operating system on my laptop, but I ended up doing it prematurely and had so many issues that I did another install, this time rolling back to the previous version of the operating system.Except that it messed up my audio subsystem so much that my music production software wouldn’t work properly.
I had looked at installing AV Linux MX Edition when I was given a new computer last year, but I hadn’t gotten a chance to install it when the person who bought me the computer had to claw it back. (I won’t get into why.) I’m looking at the OS again, and if I weren’t having issues with Bluetooth, I would have installed it already. The OS comes with most of the music production software I want to use pre-installed.
Just before moving this from draft to the website, I was able to resolve the Bluetooth issues. Once I publish this, I’ll install AV Linux this evening. Once it’s installed, I’ll write up my thoughts on it, including how I connected my Bluetooth keyboard.
The holidays are already here again?
Yep, it’s that time of year again. I did even less for Turkey Day than I did last year, because I wasn’t up for making, eating, and storing that much food in just three weeks after my hospitalization. The government shutdown has screwed up a lot of people’s food budgets, including mine, but my state turned SNAP benefits on just in time for when I usually get mine, so I didn’t have to panic about making groceries.
This year, I decided against putting up any decorations for Catmas. Putting them up would take a lot of time and effort for just me and Chuck, and Chuck mostly likes the tree for climbing. I spent too many mornings last Catmas standing the Catmas bush back up and putting decorations back on it, so I’m taking a pass on it this year.
I’m still playing my Catmas music, and I’ve already pulled out my binder of charts for Catmas songs I want to work on. There are a lot of Trans-Siberian Orchestra songs that I printed from Songsterr in it, and I also have two guitar tracks for Slade’s Merry Xmas Everybody. Let’s face it, as a Doctor Who fan who plays the electric guitar, it’s almost required that I learn that song. Goddess knows it’s been in the show enough times. (My favorite time is Last Christmas from series 9.)
Have a Purrrrrry Catmas!
This may be my last article here for the year. I have an update that’s owed on my Second Life site as well, and I haven’t even started writing it yet. I hope everyone can have the purriest of Catmases and a scratch-free New Year, whether you celebrate my version of the holiday or not. Be kind, and don’t let the assholes and haters harsh your mellow, even if the assholes are family members.
This article is part of a series on the recording of my song Somewhere Someone Cares. You can find the articles in the series under the category SSC.
Whoops! Last week’s update didn’t get published. As I was finishing up the previous week’s update, I had to go to the emergency room. I won’t get into what happened, but my entire Labor Day got screwed up. It took me most of last week to get back on track. But in the process of getting back on track, I made a preview of Somewhere Someone Cares that I can share.
Momma wants a mixer
I recently found a tool I had been wanting. As a former recording and live sound engineer, I love having a physical mixing console. I find it easier to adjust faders with my hands rather than with a mouse. I know I can buy physical mixing desks that I can use with my computer via MIDI. The problem is that they’re expensive for an older person on a fixed income. The space to set one up is also at a premium in my studio.
Enter TouchDAW
I had run a search for an app I could use on my tablet before, but hadn’t found anything. I looked again recently, I found a thread on the Linux Musicians forums. The thread I found is on controlling Ardour with an Android device. I had seen it before, but it has a link to a site in Japanese. Since I can’t read Japanese, I had ignored it.
What I hadn’t noticed before was a reference to an app called TouchDAW. The developer calls it “a full-featured DAW controller combined with some general purpose MIDI tools running on Android™ devices and recent Chromebooks.” TouchDAW loooks like it’s just what I was looking for. I installed the app on my tablet, but found a problem on my laptop. It requires a program called rtpMIDI, and that’s not available for the version of Debian Linux my laptop runs.
I run SolydK Linux 12 on my laptop. SolydK 12 is built on Debian 12 (Bookworm), but rtpMIDI was recently rebuilt and requires Debian 13 (Trixie). There is a disk image of SolydK 13 available for installing (and testing), which is good news. I’ll update my laptop as soon as the updare script is released. Then I can install rtpMIDI and TouchDAW. TouchDAW has a demo you can try, and if it’s the solution I think it is, I’ll gladly pay the $4.99 to buy the full program.
I can haz guitar tracks nao?
I’m still working on recording the rhythm guitar track under my fingers. After adding the organ solo to the song, I needed to add room for it to my files in Ardour. I ended up printing out the master score for the song. Now I can see exactly where the regions from the organ solo going out needed to be.
I remembered that I had started creating the lead vocal melody music, but what I wrote wasn’t accurate. I couldn’t lock in the syncopated rhythm. The melody itself isn’t hard to get. After all, I’ve been singing the song to myself (and my furry son Chuck) for two decades. My fingers couldn’t get the rhythms right to play it into MuseScore. I ended up writing the music old school, one note at a time. I now have sheet music with lyrics for an original song for the first time ever.
Wait, now the timings are wrong
I had jotted down the timings for each section of my song on the lyric sheet, but since I added the organ solo, I had to redo the timings. It turns out the file I was using for the lyric sheet went to the Great Bit Bucket in the Sky at some point, so I had to recreate the file. That’s actually not a problem, because now I can add the timings to the lyric sheet document itself.
As I tried to add the melody to the score, the rhythm for the lyrics, I kept finding that the rhythm wasn’t right in one spot. But when I started trying to place the lyrics, the rhythm of the line fell into place. I now have not only the lead vocal part written out, but I also have the harmony vocals written. I plan on eventually creating a piano/vocal version of the song in case someone wants it at some point.
Moving right along…
Once I had the vocals written, I turned my attention to the music for the Hammond B3 organ and Fender Rhodes. I had preliminary tracks for those instruments on BandLab, and I was able to finish their music pretty quickly. I still have to come up with the guitar and organ solos, but I’m going to hold off on that until after I get reference guitar and lead vocals recorded.
Houston, we have a preview
Since I have the majority of the music for the song written, I created a preview video of the song with MuseScore. This will give you an idea of how the song sounds, and you can see what the lyrics are and how they fit into the arrangement.
A flute covers the lead vocals in the video. Synthesized “ahs” cover the harmonies to give you an idea of what I have in mind. You can see the vocals with the top stave of the score, but in case they’re not legible in the video, they’re in the description on YouTube.
Once I get the reference guitar and vocal tracks recorded, I’ll post another preview of the song. I won’t promise it will be a preview of the whole song like this one is, but it should give you a better sense of where the song is going.
Meanwhile, in Second Life
My virtual self is opening a new store in Second Life. The store is pretty much laid out, and I’m in the process of making a new sign for the store in Blender. Once that’s made, and I get some plants in the store, there will be an inworld Nanci’s Naughties store for the first time since COVID hit. Keep an eye on the website, follow my avatar on Bluesky, or join the Nanci’s Naughties SL group to find out when the new store opens.
What’s next?
I need to bring the new, longer drum chart into Ardour as a MIDI file and re-tweak the track to correct some differences between what MuseScore plays and what my virtual drumkit will play. A MIDI file of the longer bass line will get uploaded to BandLab so I can export it using their virtual bass. Then I need to get some serious Strat time and get at least a reference track for it and the lead vocals.
I’m still dealing with the thing that drove me to the emergency room last week, but after a doctor’s appointment today, it’s more manageable until I can schedule an appointment to go in and see about resolving the issue.
Can you believe it’s already September? It seems the older I get, the faster time flies by me. I hope to get next week’s update published on time, which should be late Sunday or early Monday. Take care of yourself, and don’t let the assholes harsh your mellow too much.
I recently started a new series of articles on my song Somewhere Someone Cares, and I said I planned on writing updates every week. But no update has been posted in over a week.
A health issue popped up that had me in the emergency room twice this week. I was writing the article when I had to go to the ER the first time. Each trip to the ER lasted over 10 hours. Of course, that has thrown a huge spanner into my plans for the week.
I have been working on the song when I can. First, I have to shoot some video, because the article already has a spot set aside for it. Now it’s just a matter of getting a quiet enough time to shoot the video, but I’m a night owl, so that gives me some nice late-night time to record things like vocals and video.
Enjoy your weekend, and I should have something for you to read and play in a couple of days.
For the past few years, I’ve been talking about my song Somewhere Someone Cares. Except I haven’t shared much on its progress, except for an occasional post on Bluessky. But that’s going to change.
Today I’m starting a series of posts about the song, beginning with the inspiration for it. I plan to write an update at least once a week to show how the recording is going. I’ll also write extra posts when there’s news that I don’t want to wait to share. You can find all my articles about the song under the categorySSC.
Inspiration strikes
In the summer of 1996, I was studying composition at the Longy School of Music (now part of Bard College) in Cambridge, MA. One Sunday, I was in a practice room playing the piano, just noodling around to try and come up with something that could be an idea for a new piece. I had already written a piece for solo piano as well as part of a string quartet that I was working to finish. It was time to start something new, or at least get an idea to put in my bottom drawer.
I had taught myself piano in my mid-teens, although my left hand was (and still is) rubbish at just about anything except for playing octaves. I knew a lot of chords and had written over 50 songs since my teens, although most had never seen the light of day since they required the one thing I didn’t have: a band to play them.
Then my hands played a three-chord progression that stopped me in my tracks.
“Hey, that’s kind of nice,” I thought. I heard the beginning of a song, with the chords played on an organ and a soul gospel choir singing it. I made a mental note of it and kept noodling along.
The beginning grows
In 1999, I served as the sound engineer for the Sunday night contemporary youth services at a local church, and I occasionally had the opportunity to sing during the offertory. One night, while I was showering, I decided to let that riff roll through my head, and the song started coming to me. Rather than a soul gospel song, it was a blues rock tune, and I started getting the lyrics for it. I grabbed my notebook when I got out of the shower and began writing the words down. The lyrics were written within half an hour. I didn’t write the chord progression since my ear isn’t that good, but I already had most of the arrangement in my head. I had ideas for guitar solos, but I heard everything else in my head.
Now all I had to do was get a band together to play it. *sigh*
Fast forward 20 years
The song popped into my head occasionally over the next 20 years, but it never got closer to being performed or recorded.
When COVID-19 broke out and the government decided to send out what was quickly called “COVID checks,” I decided to use part of mine to get either a guitar or a keyboard so I could start doing something with my music. As I started looking into instruments, I quickly saw that a beginner’s electric guitar kit was a lot cheaper than an electric keyboard, so a guitar it would be.
I had been playing the piano for half a decade when I got a chance to learn recording engineering at a local studio. One of the perks of working at the studio was being able to play the instruments when there were no sessions booked. I had an acoustic guitar when I was a kid, but I never took lessons on how to play it. I ended up getting the Fender Stratocaster from the studio during some downtime and started messing around with it. Before long, I wanted to learn how to play the electric guitar, and I wanted to play a Strat, partly because that’s what Eric Clapton played. (I stopped being a Clapton fan when he announced he wouldn’t do any concerts at venues that required people to be masked. Didn’t he realize he was risking his own health? He wasn’t a sping chicken, but I also learned he’s long had a reputation for being an arsehole, so see ya’, Eric.)
Buying my first electric guitar
I decided to buy a Squier Stratocaster Pack from Musician’s Friend. It came with a Squier Affinity Stratocaster, an amp, a padded gig bag, a guitar cable, a strap, and a set of picks. It also came with a free 3-month subscription to Fender Play, Fender’s online guitar lessons.
While I waited for my guitar to arrive, I made a list of songs I wanted to learn how to play. Not far from the top of the list was Somewhere Someone Cares. Thanks to Fender Play, I also learned how to play the riff for the Rolling Stones’ (I Can’t Get No) Satisfaction, a basic version of For What It’s Worth by Buffalo Springfield. I also learned the riffs from Another Brick in the Wall, Pt. 2 by Pink Floyd and Blue Öyster Cult’s Don’t Fear the Reaper. They also helped me start learning Cissy Strut by The Meters, Deep Purple’s Smoke on the Water, and Spooky by Atlanta Rhythm Section, as well as some other songs I like.
Finding the right key for the song
There is a problem with Somewhere Someone Cares. As it was inspired, it was in the key of B♭, which I’ve learned isn’t a guitar-friendly key. I knew I had to find a better key to play it in. I just had to make sure I picked a key that doesn’t go too low for my voice. As I worked on Satisfaction, I realized that the riff was close enough to the riff for Somewhere that I could start figuring out the chords for my song.
The riff for the introduction is also used for the verses. Once I hit the pre-chorus, though, I needed to find the chords I wanted to use. I found the smartChord app, and it was a huge help in identifying chords. With that, I was finally on my way to getting my song playable.
The next thing was to start laying down tracks for a demo.
Time to get recording
There are several ways to record songs on a Linux computer. I started using a program called G-Stomper Rhythm to write a drum program for the song on my tablet. It was a good way to start, but I ended up using the Hydrogen drum machine on my laptop. The combination of that and the Rosegarden digital audio workstation (DAW) would help me start laying down tracks.
I was able to save a MIDI file of the drum track from Rosegarden. That let me upload it to BandLab, an online recording and collaboration platform for musicians.
Oh, MIDI, how I love you
I knew about MIDI, the Musical Instrument Digital Interface, from my days in the recording studio. It’s a way for a computer to tell a sound card how to play music. It also lets me “write” a bass line on BandLab to give me a way to work on the rhythm guitar part from my phone. I also got Fender’s Mustang Micro headphone amp to let me play along with the tracks on BandLab. It also helped me find a combination of amplifier and effect to use with the guitar.
Momma needs more gear.
I knew I needed a way to plug my guitar into my computer, and that needed money. Last year, I was picked for jury duty on a trial that lasted over a month. The money I got from jury duty paid for the next gear I needed. For an audio interface, I looked at the Focusrite Scarlett Solo (3rd generation) interface. Then I saw the Scarlett Solo Studio package. The Studip package includes a microphone and a good pair of headphones with the interface. With the addition of a boom mic stand and a pop filter for the microphone, I was ready to start recording both my guitar and vocals.
The trial lasted long enough that I was also able to buy a folding keyboard to play. It developed a fault within a month or so of using it, so I won’t identify the keyboard. I ultimately replaced it with an M-Audio Keystation 49es MIDI controller. I can finally use a proper keyboard to make music. All the keyboards I had bought previously were either glorified toys or had no sensitivity to how I played. That may work well for an organ, but if you play a real piano, a big part of how it sounds is how hard or softly you hit the keys. The Keystation has velocity sensitivity, and for the first time since I played an actual piano, I have to work on how much force I use as I play.
The problem with the Keystation is that it’s a controller. That means it doesn’t make any sound by itself and has to be plugged into something that will turn what I play into sound.
It’s time to shop for instruments.
During COVID, the SamplesOn company recognized that a lot of people were learning how to play instruments while they were locked down, and they released a free virtual tonewheel organ called CollaB3, and it’s now up to version 2.It gives you a virtual Hammond B3 electric organ with a Leslie speaker that you play on your computer with a MIDI keyboard.The Hammond B3 is the most popular organ in rock and roll, and the Leslie speaker gives you some pretty cool audio effects.
The studio I worked at had a B3 with a Leslie speaker. I didn’t get to play with it much, but I knew I wanted that sound for my song. I didn’t have a keyboard to play the CollaB3 organ with yet, so I downloaded the virtual organ. It was tuckedaway on my hard drive until I could use it.
After some searching, I found a virtual grand piano called the Virtual MIDI Piano Keyboard, which I can play from the computer keyboard or a MIDI keyboard, and it became my tool for working out music. I already knew about notes and chords from my days in secondary school choirs and learning how to play the piano, but I’m not great yet at figuring out notes on the guitar as quickly as I can on a piano.
Somewhere needs more than just a virtual organ
Since I got my Keystation, I also found several other free virtual instruments I can control from it, including Dexed, a software version of a Yamaha DX7, the workhorse of my days in the studio back in the early ’80s. You could hardly swing a stick in the ’80s without hitting songs that used a DX7. The Dexed virtual synth gives you the chance to get any sound you could make on a DX7 on your computer. You can also get virtual cartridges programmed with sets of “patches,” or sounds you can use in your music. One of the “cartridges” has a sound called BABY CAT, which sounds like a cat’s meow.
I started going through all the sounds on the “cartridges,” but I still have a lot of sounds to check out.
Exit Rosegarden
The more I used Rosegarden, the more I realized I want something more from my DAW. My laptop runs SolydK Linux, which is built on Debian, and there are other DAWs available in the repositories (repos), which is Linux’s version of the app store. After checking out other possibilities, I installed Ardour, one of the big guns in digital multitrack audio recording. There’s a bit of a learning curve for any DAW software, including Rosegarden, but Ardour felt more like a digital version of what I used in the studio than Rosegarden did.
Enter MuseScore
Since my days at Longy, I loved being able to write out music to help me figure out what I want to play. I found some free blank sheet music online, and I used it for transcribing Fender Play lessons. For Somewhere, though, I wanted to write sheet music on my computer so it would be neater and easier to read. MuseScore is a great tool for writing sheet music, whether you’re writing for piano, voices, orchestral instruments, guitars, basses, or even drums. Since it’s in the Debian repos, I installed it and was able to start using it fairly quickly.
I decided I wanted to write charts (sheet music) for the drums in MuseScore, so I can write the music out and then save it as a MIDI file I can load in Ardour or upload to BandLab. I dabbled on the drum kit during my studio days, so writing for a drum kit isn’t completely a foreign language for me. MuseScore makes it easy to write music with a MIDI keyboard or the mouse, but I needed something in my hands to play the “kit” in front of me. A pair of Vic Firth American Classic 5B drumsticks, the sticks I used when I played the drums in the ’80s, made it easier for my brain to convert what was in my head to “paper,” even if there was nothing for the sticks to hit.
What about BandLab?
I had created tracks for drums, bass guitar, organ, and a Fender Rhodes-type “chime” piano on BandLab, but they only went as far as the pre-chorus. Once I had the full drum part written out, I printed it out so I could fine-tune the track in Ardour. I had to pick what virtual drum kit I wanted to use in Ardour, and I decided to use DrumGizmo as my virtual drum kit. There are several drum kits to use with DrumGizmo, and their Crocell kit fits my song perfectly.
I downloaded the tracks I made on BandLab as MIDI files and dropped the bass track into MuseScore. It was a good starting point for writing a chart for the bass track, and I was able to write the rest of the bass part. I pulled the music for the drums into the file for the bass to help me write, and I ended up with not only MIDI files, but also printed sheet music to refer to as I wrote the rest of the music.
Houston, we have a problem
I went through all the virtual basses I had on my computer, and quickly decided that I didn’t want a synth bass for the track. In the meantime, I uploaded an audio file of the drum track I had created and the new MIDI file for the bass track to BandLab so I could use it to work on playing the guitar part. It turns out that BandLab has a great electric bass sound, and I was able to tweak it to sound even better. I downloaded it as an audio file and imported it into the Ardour session for the song.
I was also able to start creating a combined score for organ and piano from the MIDI files I downloaded from BandLab, although I still have most of the score to write.
Is it time for the guitar track?
I had already figured out the chord progression for the rhythm guitar for the entire song, so before I started laying down a guitar track, I wrote it as sheet music in MuseScore.That ended up being a big help in remembering what I wanted to play where. The only problem is that I kept having to tweak the chart, and every change meant I had to print out the guitar chart all over again.
I realized I wanted to be able to bring all the charts into a master score, similar to what conductors use with an orchestra or what you can use to study a piece of classical music. It turns out it’s easier to make a master score and export the individual parts than it is to take individual scores and import them into a master score.
Either way, I’d be doing a lot of copy-and-pasting, but I created a master score for the song, adding places for the music for the keyboard tracks as well as the lead and background vocals. The whole master score is 42 pages long, but I won’t be printing that out for a while, so it’s all good.
Oops!
After creating the master score, I realized I had completely forgotten about part of the song. The song, as the score is laid out, follows this pattern:
Intro
Verse (a slight change of the intro)
Pre-chorus
Chorus
Intro
Pre-chorus
Chorus
Guitar Solo 1a (based on the intro)
Guitar Solo 1b (based on the pre-chorus)
Bridge A (just the drums and bass)
Bridge B (reuses the Bridge A chord progression with everyone else coming in)
Guitar Solo 2 (uses the bridge chord progression)
Chorus
Chorus
Vamp
Cold ending
But after creating the master score, I remembered that I completely forgot about the organ solo, which comes after Guitar Solo 2 and the Chorus. I added a space in the score for it, and I need to tweak the music for the drum and bass.
I also want to extend the drum solo, and it will be fun getting my brain to figure out exactly what I want there. Once all the new music is written, I’ll upload the bass into Bandlab, then import the new drums and bass tracks into Ardour.
If I’m playing everything myself, why do I need sheet music for it?
My brain isn’t what it used to be, and I never had that great of a memory. As a result, I used to make notes about everything. I used to say I had a mind like a steel trap. But look at a steel trap, also called a bear trap. If something is caught between the teeth of the trap, it’s caught and won’t go anywhere. But if the trap is sprung and doesn’t grab something in the teeth? It’s free to go and continue on with whatever it was doing. (Thankfully, this kind of trap is no longer being used since it’s pretty cruel to whatever it catches.)
By writing (and printing) sheet music for the various instruments of the song, I have something I can look at as I’m recording
it. Creating the sheet music has already paid off, not just in getting the rhythm guitar part under my fingers, but also in figuring out what I want the bass to play. I can print out parts of the score for specific instruments as I need them, and when I have the master score finished, I’m thinking of creating a piano/vocal score that I can make available if someone wants it.
What’s next?
I still need to lay down reference tracks for the rhythm guitar and lead vocal, plus I want to start writing the vocals in MuseScore.As always, I have a lot to do, but it always feels good to get a task done. With each task getting done, Somewhere Someone Cares is closer to having something I can share an early mix of.
Back in the 1990s, I lived and worked in Boston’s Back Bay area. One of my favorite things to do after work was to stop into Chili’s at Copley Place and get my favorite thing on their menu. It wasn’t their burgers or their margaritas (although I loved both of them). My favorite thing to get was their chips and Chili con Queso. I’ve been known to get a second order of chips and queso because I loved eating it so much.
Chili’s left Copley Place in around 2009, and a few years later, they also closed their location in Harvard Square a couple of years later. Now people in Boston have to go out to the suburbs to get their Chili’s fix.
Looking for a homemade version
Off and on over the years, I’ve looked for a good recipe to make chili con queso at home. I wasn’t able to find one, so I looked for a recipe for queso sauce. All I could find are recipes that use Velveeta. I know some folks love Velveeta, but I disliked the gritty texture I always noticed in dishes that feature the block of pasteurized American cheese product.
What I was able to find was the ubiquitous jars of Tostitos Salsa con Queso. It’s pretty good, but I try not to give money to Frito-Lays’ corporate owner, PespsiCo. PepsiCo has been on my avoid list for several years due to their planet-killing love for palm oil. I’ve tried other brands of store-bought queso sauce, but none of them are as good as Tostitos’.
Having found a queso sauce, I made tacos one night, specifically making enough meat to have some left over. I stirred some taco meat into a bowl of salsa con queso, and I knew I had found the snack I had been trying to duplicate for over a decade.
Before we start, I have to point out something
This recipe makes enough dip for a single serving. You can double it (or more) to feed more than just one person, but you’ll have to increase the heating time. Make sure you heat it at 70% power in the microwave and stir it every 30 seconds.
A good dip needs a good chip
Frito-Lay’s Tostitos brand of tortilla chips is the 600-pound gorilla of the tortilla chip world. I prefer a plain corn tortilla chip like the original toasted corn flavor Doritos introduced to the United States in 1966. Flavored tortilla chips aren’t necessarily bad, and I love the taco-flavored chips Doritos introduced in 1967. But if I’m dipping a tortilla chip into something like salsa or queso, I don’t want a flavored chip to compete with the flavor of what I’m dipping it into.
Santitas, another Frito-Lay brand, became my favorite tortilla chip for dipping with its good corn flavor and easy dipability. I consider it the closest thing to the OG Doritos I loved that you can buy today.
America’s Test Kitchen did a taste test of tortilla chips in 2022, and while they crowned Tostitos their winner, they said Santitas was highly recommended. But they looked at the chips on the market again in February 2025, and the rankings changed a bit. Santitas was now #5, and Tostitos had dropped to #8. I was tempted to try Mission, the chip ranked #1 in the new taste test, and Juantonio’s (#2), but I had tried Over the Border (#3) and thought they were pretty meh. Utz, a regional chip brand from Pennsylvania, came in at #4 with their TORTIYAHS! Restaurant Style Superior Dipping Chips with Sea Salt. I found them at the grocery store and bought a bag to try, and I love them. The Cantina Style is a flavored version that I’m not wild about, but I always have a bag of the restaurant-style chips in my pantry.
Making the dip: First up, Taco Meat
It’s a pretty simple recipe to make the dip, and the first thing you need is some taco meat. I like to use Rachel Cooks’ version of taco seasoning mix. Not only does it have less salt and none of the preservatives of the supermarket pouches, but you can tweak the recipe to make it your own.
I know most folks know how to make taco meat, but I do something different with mine. Several years ago, I saw a great tip from America’s Test Kitchen to make a slurry before browning the meat. Before you brown the ground beef, toss it in a slurry of water and baking soda to help the meat retains some of its moisture, (I don’t recall where I first saw the tip, but it’s on a sticky note in a kitchen cabinet so I can use it whenever I make something with beef that I dont want drying out.)
After browning the ground beef, drain the grease and sprinkle your taco seasoning mix over the beef, then add some water to make a sauce that will help flavor the meat.
Now to add the meat to the queso
This was the hardest part. How much queso should I start with, and how much taco meat do I add to it? It was hard to find that Goldilocks point, and I always forgot to make a note of my proportions. Once I decided to develop the recipe for sharing, it took me several iterations to nail down the ingredient list.
I like to serve it in a paper-towel-lined plastic restaurant-style plastic basket that I got from Dollar Tree, but they’ve been discontinued. The basket gives me enough room to put the bowl of dip into the basket along with the chips.
Nutrituion
If you’re hoping to see nutrition information for this recipe, I don’t have it. I won’t call taco meat, store-bought queso sauce, and tortilla chips a healthy snack, but I don’t have the resources to get nutrition information for my recipes.
If you’re making taco meat for this, put the ground beef into a medium mixing bowl.
Make a slurry by putting 1 tablespoon of water into a small bowl and adding the baking soda to the water. Stir the baking soda into the water, making sure it’s well mixed and you don’t have any baking soda at the bottom of the bowl. (Doing it in this order makes it easier to mix it together. If you add the water to the baking soda, it’s really hard to get rid of the bubbles of dry baking soda.)
Pour the slurry over the ground beef, and toss the beef to make sure it’s all coated with the slurry.
Brown the ground beef over medium heat in a nonstick skillet, using a wooden spoon to break up the ground beef into small pieces. Continue cooking until the ground beef is no longer pink. Drain the grease and return the skillet to the heat.
Sprinkle the taco seasoning over the ground beef and pour 2 tablespoons of water over it. Stir it all together and simmer, stirring occasionally, until the sauce reduces and is almost completely absorbed by the ground beef, approximately 6 minutes. Remove the ground beef from the heat and allow it to cool for 15-20 minutes.
Once the meat has cooled, put 1/2 cup of queso into a medium bowl. (I use a 10-ounce glass custard cup.) Stir in 1/3 cup of the taco meat. (Serve the rest of the meat in tacos or store it in a covered container in the refrigerator for another use.) Stir until well mixed and put in the microwave oven, covering the bowl with a small plate to prevent splatters.
Heat the dip for 2 to 2-1/2 minutes at 70% power, stirring every 30 seconds. If you’re using queso and taco meat from your refrigerator, you’ll definitely want to go the full 2-1/2 minutes. Be careful, the bowl will become quite hot. You may want to serve the dip before the 2 minutes are up, but going the full time will heat it enough to keep from losing too much heat as you enjoy it.
Serve with tortilla chips.
If you make this, leave a comment letting me know how it comes out. If you know of a good recipe for a queso sauce that doesn’t use Velveeta, I’d love to know about it.
Edited because my brain wouldn’t do maths when I wrote this.
In 1787, Elizabeth Willing Powel saw Dr. Ben Franklin at the Constitutional Convention. On the last day of the Convention, she asked him if our country was a monarchy or a republic. She asked this question, and Franklin’s reply is a famous one. “A republic,” replied the Doctor, “if you can keep it.”
The founders of America never envisioned threats to the republic we have in 2025. They especially didn’t expect them to come due to the actions of the sitting President.
As I started my day on the 4th of July, the country’s 149th 249th birthday, the idea for a new merch design sprang to my mind. There are concerns that our republic may not even reach its 150th 250th birthday.
About the flag
I know many people will be unhappy with my flag being upside down. Some people hated it when Trump was president the first time, but were more than happy to fly it that way when Biden was in office.
When a country is in distress, its flag is flown upside down to indicate an emergency or trouble. Many people across the political spectrum argue that our nation is currently experiencing distress.
What about the limited-time items?
I recently put some of my designs on the Unisex Stars & Stripes T-Shirt and the Americana Tote Bag which will go off sale at the end of today. The Republic design belongs on those items, and I won’t take them off the market, especially since they weren’t available for the 4th of July.
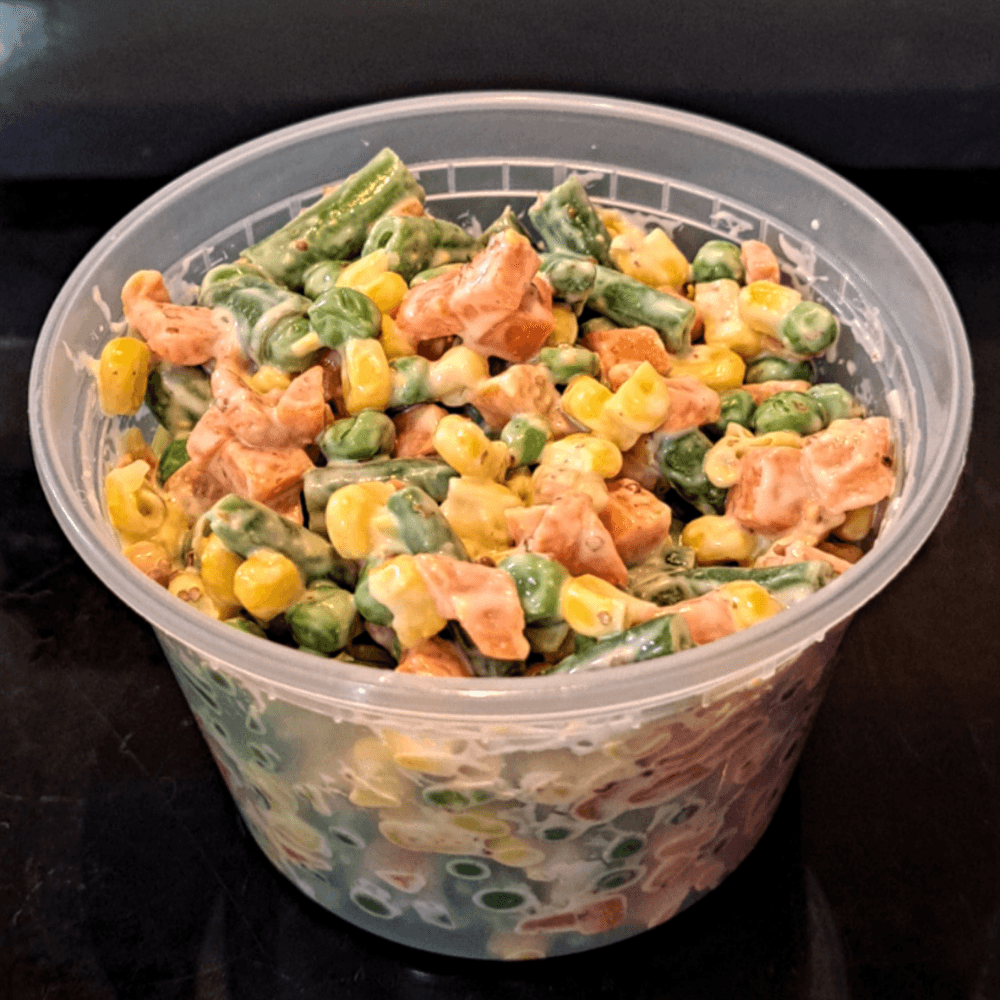
Growing up in New Orleans, my mother and grandmother weren’t typical American meat-and-potato cooks. They were more Creole cooks, making great use of the flavors and ingredients that were plentiful in South Louisiana. One of my favorite things my mom made was a salad called Salad Russe. It’s a great make-ahead salad for hot and humid New Orleans summer evenings.
I never got her recipe, but I managed to recreate it and put my own twist on it. It’s super simple, and you may have all the ingredients already. I use two ingredients from New Orleans that can be found online. If you can’t find the specific ingredients I use, you can get substitutes at your local grocery store.
Cool your veggies before adding the other ingredients
After cooking the vegetables, allow the veggies to cool on a rimmed sheet pan before adding the other ingredients. This is a tip I got in a recipe for a rice dish from America’s Test Kitchen, but I don’t remember which recipe it was. I love how it lets me get back to making the salad more quickly.
I know cooling the veggies on a rimmed sheet pan is an extra thing to wash. I’ve found that adding the mayo to hot veggies changes the texture of the mayo in a way that doesn’t benefit the salad. You can add the salt and pepper while the veggies are still hot, but I find I can mix it in better once it’s in the mixing bowl.
Notes about my ingredients
The links below go to the manufacturer’s pages for the products. You can order directly from these links, and you can also buy them from Amazon. I’m providing alternate links for those who would prefer not to shop with Amazon.
The mayo and mustard I use are products that I grew up eating in New Orleans. I grew up eating Blue Plate Mayonnaise, and I often drove past their factory when I would drive to work downtown.
You may wonder why I use an olive oil mayonnaise rather than regular mayo. One of my doctors put me on the Mediterranean Diet a few years ago. I got a jar of Blue Plate Light Mayo with Olive Oil to see how it was. It turns out I couldn’t tell the difference between the two mayos, so I’ve switched to buying the olive oil variant. If you prefer a different brand, you can use it, but Blue Plate has a flavor profile that no other mayo has.
I always put Zatarain’s Creole Mustard on my sandwiches growing up, and it’s been a standard condiment in the house since I learned I could buy it online. My mom’s Salad Russe didn’t include mustard, but I added it to this salad to give it a little extra zing. People who have tried my Salad Russe say it makes my already great salad even better. You can substitute Dijon or spicy brown mustard if that’s what you prefer, but it won’t taste the same.
Salad Russe à la J.M.
Ingredients
1 12-ounce bag of frozen steam-in-the-bag mixed vegetables
Salt and pepper to taste
3 tablespoons Blue Plate Light Mayonnaise with Olive Oil
2 teaspoons Zatarain’s Creole Mustard
Preparation
Cook the bag of mixed vegetables according to the package directions. If you prefer to cook them on the stovetop instead of in the microwave, that’s fine. I nuke them because it’s quicker and easier to do.
Optional, but recommended: Spread the cooked vegetables out on a rimmed baking sheet and allow them to cool, approximately 5-10 minutes. If you don’t do this, let the vegetables cool completely before the next step.
Move the cooled mixed vegetables to a medium mixing bowl and add salt and pepper to taste. I don’t have measurements for the salt and pepper because I’ve never found a set amount of salt and pepper that I use.
Stir in the mayonnaise, making sure to coat all of the vegetables. If you want a creamier salad, you can add a little more mayonnaise. Just make sure you don’t end up making the salad scream MAYO at you when you taste it. I did that once, and it wasn’t pretty.
Stir in the mustard, making sure it’s well distributed across the salad.
You can serve it immediately, but it’s even better if you put it in the refrigerator for an hour or so to let the flavors meld before serving.
If you make it, let me know what you think of it. I think you’ll find it’s a perfect vegetable side all year round, especially when it’s hot and you don’t want to cook.
Last week, I wrote that I would be releasing some star-spangled items for the 4th of July, and I’ve created some patriotic shirts and bags to celebrate our nation’s 249th birthday. I meant to publish this earlier this week, but a heat wave in Boston forced me to spend some time away from my computer.
Unisex Stars & Stripes T-Shirt
The Unisex Stars & Stripes tee is a white T-shirt with a field of stars on the right sleeve and red and white stripes on the left sleeve. Show your love for your country and your love for those the government doesn’t always love.
This tote is not only roomy, but it’s also a great way to show that you love America, as well as those often hated by those who love to wrap themselves in the flag.
The Black Trans Lives Matter and Palestinian products are benefit items
I don’t want to make any money off of other people’s suffering. The proceeds of every product with the Black Trans Lives Matter design benefit the Marsha P. Johnson Institute. It was harder trying to find a charity for the designs supporting Palestinian civilians was harder, but I selected a Chuffed campaign that benefits the children of Kahn Younis, Gaza, to get the proceeds of every product that features a Palestinian flag.
Don’t wait too long to place your order
You can get 20% off your entire order from 26-30 June but don’t wait too long. As of today (Friday, 27 June), if you want something with regular shipping, it will arrive after the 4th of July. The best way to guarantee that you’ll get your order before the 4th of July you’ll need to get express shipping.
Spreadshirt has a page with shipping time and cost information that is constantly updated with the current information for where your order will be delivered.
These star-spangled items are only available for a limited time
I rarely opt for waving the flag due to how the far right has weaponized Patriotism. With all the laws being put through against people who are different from them, I think it’s important for us to show that we love our country, too. But these star-spangled products will only be available until Sunday, 6 July, and I can’t promise that they’ll be available again next year.
The LGBTQ+ Pride merch has been updated in my online store. I missed some of the Pride celebrations, but Pride is really all year long, so I don’t feel like I’m too late to release the products. Since the Supreme Court handed down its ruling against trans people in Tennessee, it’s more important than ever to stand up for trans people.
I’ve pared back on how many things I sell
As I was updating the store with new designs, I realized I had way too many different items to choose from. Some designs had 70 different items, but now there are under 30 items for each design. I’ve added cuddle animals to most designs, although the teddy bears are out of stock at the moment.
I’ve also created bumper stickers for some of my designs, and those particular versions of the designs are only available as stickers and bumper stickers.
New Legislate merch
I updated the Legislate design for this year’s Pride Month. This is a design that can be worn year-round in the wake of the Supreme Court decision. I’ve also added a second version that has the Transgender Pride flag.
Updated Viva La Queer and Black Trans Lives Matter designs
I’ve come to realize that the text on my Viva La Queer and Black Trans Lives Matter designs may be hard to read on the Pride flags. I’ve changed the designs to have white text, and you can get them on a wide variety of products. As always, all proceeds from the Black Trans Lives Matter products will go to the Marsha P. Johnson Institute.
There’s also a brand new design in the shop
Back during the COVID lockdown, I saw a picture of a woman wearing a shirt that questioned their choice to not protect themselves (and others) by wearing a mask versus owning a gun. I’ve been wanting to make a T-shirt with that on it, and I’ve finally made the Mask Gun design. I know there are several versions you can buy online, but mine stays close to the original design I saw. I also have it on some non-apparel items.
Is there a different product you’d like me to sell
Spreadshirt, my merchandise partner, has beaucoup products available. It was hard to pick just what items my designs go on, but I don’t want to overwhelm you with choices. If there’s something you want to buy something on, drop me a note and I’ll see what I can do. I can’t sell something they don’t offer, but if something is available, I’ll add it to my product selection.
Can you catch the sales?
Spreadshirt has sales going on all the time. As I write this, you can get 10% off on 3 or more products through the end of the month. The best way to is there’s this sale on is to check the banner at the top of every page of the store.
4th of July merch is coming
I don’t usually do patriotic merch because American Pride has been taken over by the political right. I hate what they’ve done to patriotism, so I tend to stay away from those themes. I’m about to change that for the 4th of July.
In the coming days, you can find some of my designs on star-spangled products. Those products will only be available through 6 July, so watch for the announcement that they’re available. You won’t be able to get them again until next year, and I’m not going to promise they’ll be back then.
More designs are in the works
I’ve taken down the Be Honest Everywhere designs for the time being, and I have some more designs in development. I’ll also be changing my product lineup as the seasons change.
I’ll announce the changes here, so you may want to watch the site. I’ll be adding a way to subscribe to get updates about the site, and when I get it set up, I’ll be announcing it here and on Bluesky.
Stay cool out there
We keep having new hottest summers on record, and it wouldn’t surprise me to see this summer break records. Stay as cool as you can, and make sure you stay hydrated. And with all the diseases going around, please consider making up. It will not only protect you, but it can also protect your loved ones.
And when you can, stand up for those who can’t stand up for themselves. Make sure they know that they’re not alone out there, whether they have the wrong skin color, the wrong sexual preferences, are in the wrong body, or have the wrong faith. As we say back in the South, y’all means ALL.


 And if you have a car or truck with a bumper, have we got a sticker for you.
 The surgery was on the day that the LA Dodgers and the Toronto Blue Jays played game 1 of the 2025 World Series.
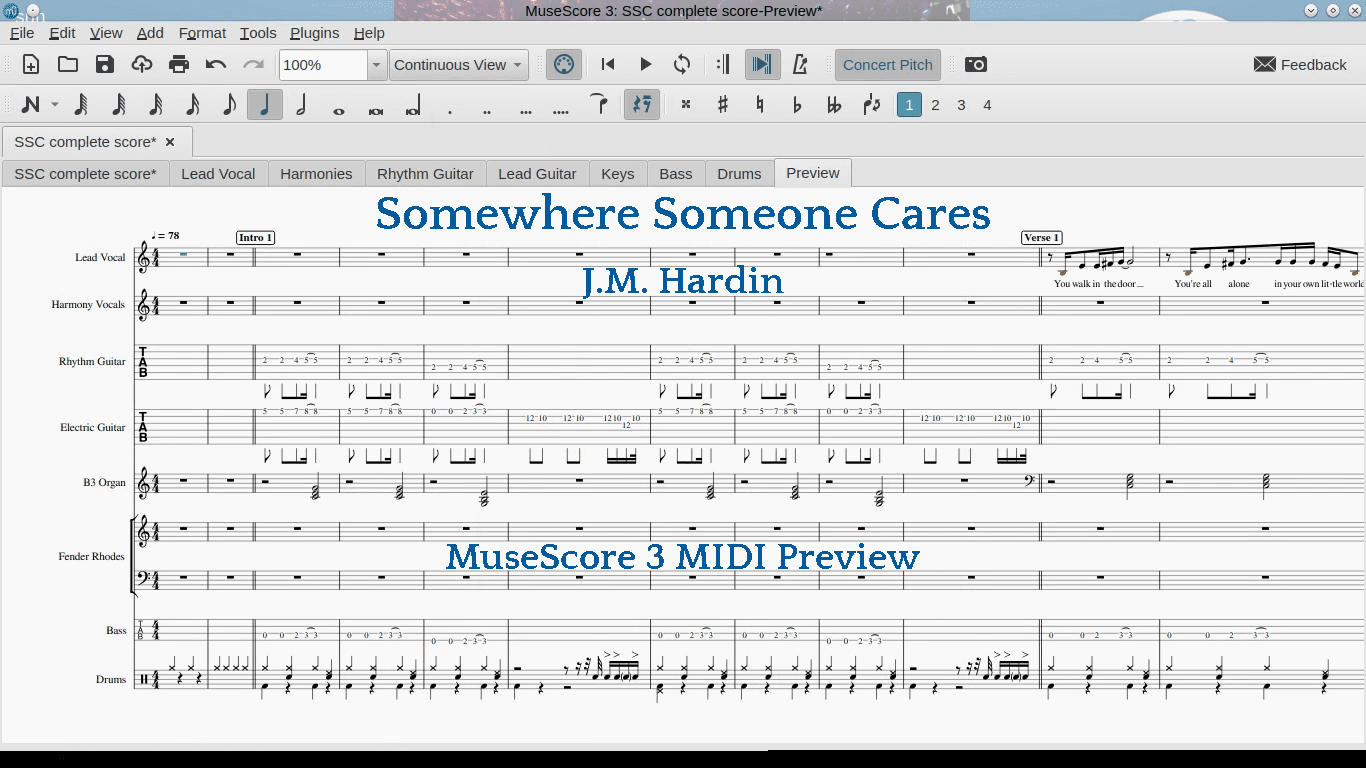
 I decided to buy a Squier Stratocaster Pack from
  I
I  I knew I needed a way to plug my guitar into my computer, and that needed money. Last year, I was picked for jury duty on a trial that lasted over a month. The money I got from jury duty paid for the next gear I needed. For an audio interface, I looked at the

 My brain isn’t what it used to be, and I never had that great of a memory. As a result, I used to make notes about everything. I used to say I had a mind like a steel trap. But look at a steel trap, also called a bear trap. If something is caught between the teeth of the trap, it’s caught and won’t go anywhere. But if the trap is sprung and doesn’t grab something in the teeth? It’s free to go and continue on with whatever it was doing. (Thankfully, this kind of trap is no longer being used since it’s pretty cruel to whatever it catches.)
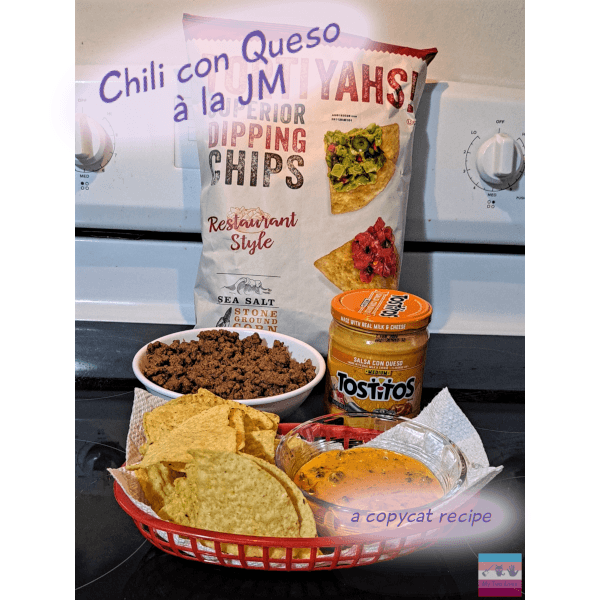


 The links below go to the manufacturer’s pages for the products. You can order directly from these links, and you can also buy them from Amazon. I’m providing alternate links for those who would prefer not to shop with Amazon.
 Unisex Stars & Stripes T-Shirt
 Americana Tote Bag
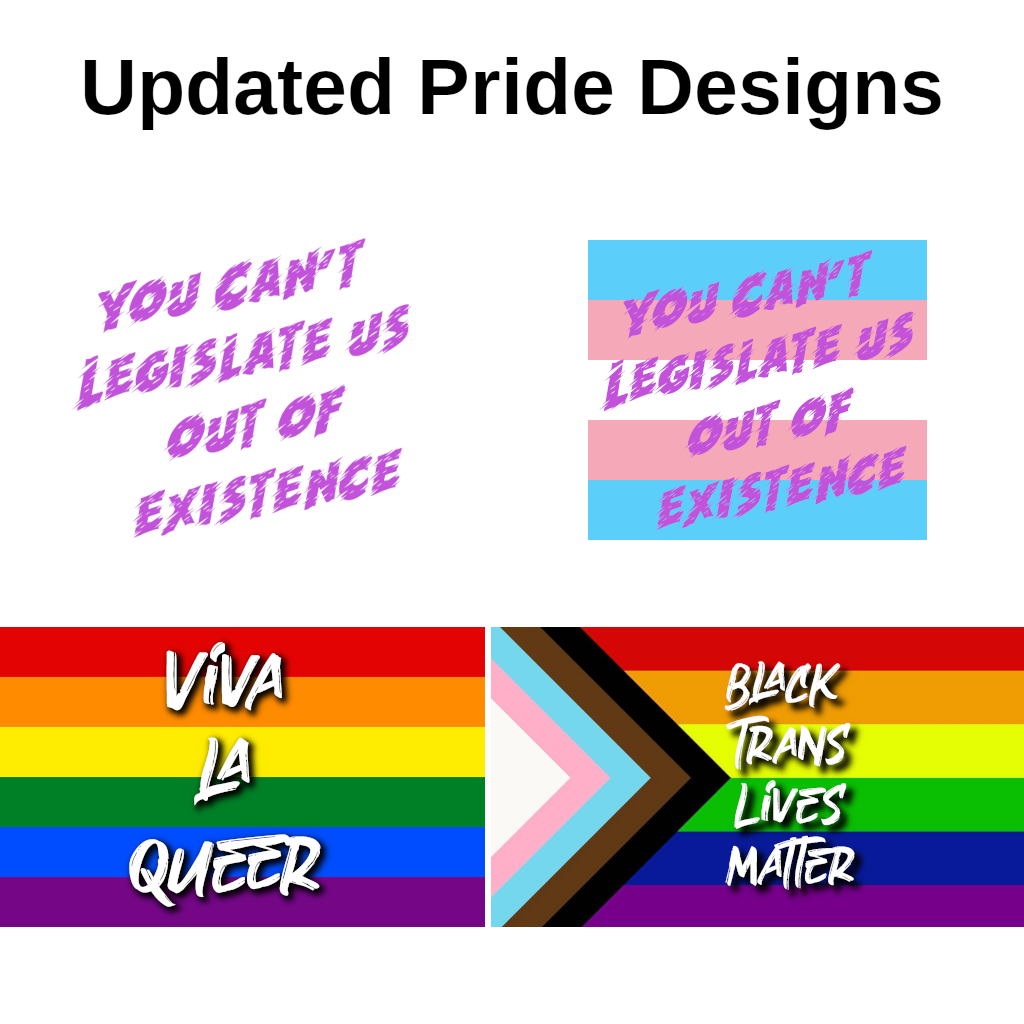
 New Legislate merch
 I’ve come to realize that the text on my
  Back during the COVID lockdown, I saw a picture of a woman wearing a shirt that questioned their choice to not protect themselves (and others) by wearing a mask versus owning a gun. I’ve been wanting to make a T-shirt with that on it, and I’ve finally made the